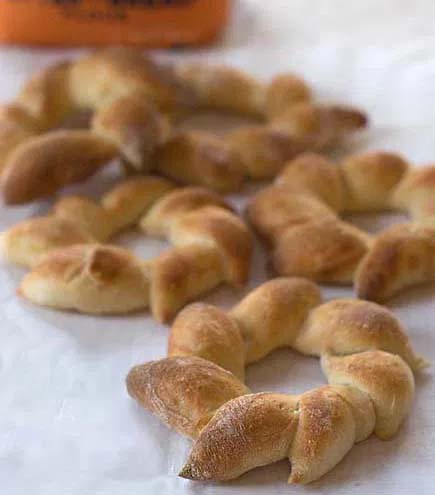
Easy but Elegant Wreath-Shaped Loaf for a Festive Holiday Table
A hundred years ago, my grandmother came to this country at age 22, having grown up on plain Eastern European fare like beets, cabbage, and potatoes, plus the occasional meat or fish when her family could afford it. Sweet desserts weren’t really in the picture. In America, when others would grab a doughnut to go with coffee, she’d ask for rye bread, put cheese on it, and declare that it was “better than cake” (the originally proposed title of Artisan Bread in Five Minutes a Day). I like sweets well enough, but, like Grandma, I tend to find things too sweet. I crave savory flavors first and foremost, even at the holidays, when everyone else is relishing sweet baked goods. There are plenty of enriched, sweet holiday loaves made with my five-minute dough here on this website (like stollen, panettone, and sufganiyot). If you’d like to sample those, click here. But if you’re like me, and you want something festive-looking but more like bread than cake, read on. This wreath loaf is a showstopper, easy to make and delicious. Why should dessert get all the glory?
When trying to create a well-defined shape, you’ll get better results if your dough is a little “stronger.” This means using bread flour in your recipe, instead of all-purpose. (You can make this swap for most of the recipes in The New Artisan Bread in Five Minutes a Day.) Bread flour is higher in protein and results in a stiffer (“stronger”) dough, for when you need the loaf to hold its shape. Just remember that when you swap bread flour for all-purpose, you’ll need to add a little extra water (details below).
To create the wreath effect, you’ll first make a ring-shaped loaf, and then give it the snipping treatment like in Pain d’Epi, the wheat-stalk bread.

I’ve been doing a round version of the Pain d’Epi for years: taking a ring-shaped bread (in French, the couronne) and cutting it like an Epi—kind of like a wreath.
For this wreath, I used my basic white-flour recipe, but since I was swapping in bread flour, which is higher in protein and absorbs more water, I increased the water for a full recipe by 1/3 cup (see my FAQ for details on adjusting for other flours). If you weigh your ingredients on a digital scale like I do, that extra 1/3 cup works out to an extra 2.75 ounces of water …
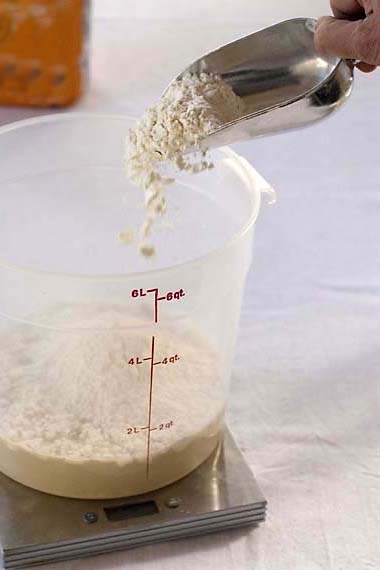
(… for more about using digital scales click here.) I used a dough whisk to mix the water, salt, yeast, and flour, but a wooden spoon or a stand mixer are great. You can see that it’s wet, but if you’re familiar with my method, it’s not as wet and as the all-purpose-flour basic white dough when first mixed:

After about two hours of rising at room temperature (assuming you started with lukewarm water and used the full dose of yeast), it can go into the fridge, where it can be stored for up to two weeks, though I used my stuff right after the 2-hour rise.
Preheat the oven to 450 degrees F, with a baking stone near the center of the oven and an empty metal broiler tray on any other shelf that won’t interfere with rising. In most ovens, 40 minutes will be enough, (check temp with an oven thermometer). Dust the surface of the dough with flour and snip off a 1-pound portion (orange-sized). Despite the fact that the dough isn’t kneaded, wet dough like this one sets up structure and stretch on its own:

Dust with flour and shape the piece of dough into a smooth ball as described in the Basics post, and then poke your thumbs through:

… and start stretching…

Keep stretching, dusting with flour as needed, until the hole is about three times the width of the sides, otherwise the hole will close up. You can watch a video of me doing this in this post:

Lay the ring on parchment paperor a silicone mat rated to the baking temperature. The hole will partially shrink back, but that’s OK.
Cover loosely with plastic wrap if you’re in a dry environment, and allow to rest for 20 minutes. You won’t see much rising during that time.
Now, the fun part! Dust with flour and use a kitchen shears to snip down nearly all the way through, cutting at a very shallow angle, about 30 degrees (this is the key to the beautiful result. If your points are coming out bulbous-looking, your angle is likely the problem). Deflect the cut pieces sideways, away from the center of the loaf:


Get under the parchment with a pizza peel (this is a picture taken when making a bunch of small—peach-sized balls of dough—wreaths) …

… and slide the whole thing, paper and all, onto the hot stone. Carefully pour 1 cup of water into the metal broiler tray (cover the glass oven window with a towel before approaching with water to prevent cracking of the glass), or check out my post on steam alternatives for other ways to generate steam in the oven. Slide into the oven and bake with steam for about 20 to 25 minutes at 450F, or until richly browned.
You can serve this thin-type loaf when still slightly warm. Just break apart and enjoy!
Wishing you and yours a joyful, healthy holiday and lots of delicious bread.
Note: BreadIn5.com is reader supported–when you buy through links on the site, BreadIn5 LLC earns commissions.
Jeff, this was an excellent post ! I still use the stollen recipie Zoe posted many years ago, and continue to use your bread in 5 books. Sourdough bread now seems to be getting more poplar and I am trying to get the great loaves I used to get with bread in 5 but it more difficult.
Have you seen my sourdough post?
https://artisanbreadinfive.com/2020/04/20/easy-sourdough-starter-with-new-troubleshooting-tips/
Can’t claim it’s as easy as my standard way…
Jeff! I had to find you online to thank you (and Zoe) for the great book and recipes. I have had your book for a long time but bread baking got pushed to the side when my parents moved in with us before Covid. They have both since passed and about 2 weeks ago I cracked the book open and made my first master batch. I wanted to get a French baguette that would make my husband stop requesting Publix French bread…and it worked. I used the last of that batch to make the delicious and decadent Sticky Pecan Rolls–they were to die for! Today I put the Pumpernickle dough in the frig and I am looking forward to testing that and several of your other recipes! Thanks again and I will be looking at your other books to add to my cookbook collection!
Thanks for writing Jackie. So nice to hear from you. If you ever have questions about the recipes please stop back!